Saturday, December 10, 2011

Christmas Dress, Kate Middleton Style


Awhile ago I picked up this white and red polka dot fabric for super cheap, but struggled to know what to do with it since it was Jersey. Jersey is not something I've worked with before. I came across Simplicity 2145 and laughed because it was a knockoff of kate middleton's engagement dress (shown below). So I decided to use this fabric with this pattern to make a Christmas dress. The dress doesn't photograph well, but it does have the wrap around the front like her dress.
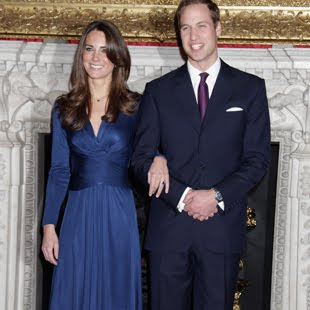


I made a size 12 and it fits pretty well. Not as well as my other dresses I've made, but pretty dang close. This dress fabric only cost me $8 so I'm very pleased about that. Like most dress patterns this pattern was too short. Must I always add 4 inches to every pattern? Ugg! The other thing I changed is I took the sleeves in by 5/8 of an inch since I was drowning in them. I probably should have taken them in even more, but laziness struck.

Overall I am pleased with it and it's really comfortable. A lot of people liked it at church and said they liked the retro feel about it.

Sunday, September 18, 2011

Gingham Dress Knock Off


I saw this dress at Net-A-Porter and thought it was cute. When I saw it, I thought it looked similiar to the dress I just made. So once again I used Simplicity 2549 and just used gingham fabric this time. I learned how to do a blind hem on this dress. I used this tutorial and it looks great. I also added a sash for the bow. I'm thinking I might make another sash in red so I can wear it different ways. I love this dress and it's my favorite thing I've made so far.


I modeled it with my red purse Matt got me for my birthday last year. Yep he is a keeper! Matt kept telling me to put my purse higher so it would fit in the picture, but this made my arm look weird. I'm in no way a model so forgive me for my akwardness.

The original dress cost $343 and my dress cost $18 so I saved myself $325. Wow, I really need to become a dress maker because they make a killing!

Sunday, August 28, 2011

Lace Skirt


About a year ago I saw a cream lace pencil skirt at New York and Company and fell in love. The problem was it cost $64 and it was too short. My solution was to finally make one. I grabbed some cream lace and lining from Hobby Lobby and got to work.

I took a pencil skirt that I had from Gap, traced the shape onto wrapping paper then added seam allowance to that to make my pattern. Then I serged the lace and the lining together. Sewed a facing for the waistband. Sewed the side seams and added a side zipper and wah lah a new lace pencil skirt. I am in love with it and I'm really proud of myself for making up my own pattern. I had to make tweaks here and there, but it ended up being a perfect replica of the jean pencil skirt I was copying.


Wednesday, August 17, 2011

Simplicity 2549 Dresses


While Matt's mom was in town we decided to sew dresses together. It gave us an excuse to check out Hancock Fabrics my favorite fabric store. We used Simplicity 2549 and used our measurements to get the perfect fit. I think we were a size 12 on the top and a 14 on the bottom. Sewing pattern sizes are depressing because your size is so much bigger than in store. Leave it to pattern companies to make you feel huge! I love how the dress came out especially the pleats in the front which are very flattering. I learned a ton from completing this pattern with Matts mom like how to do pleats, facings, and darts. I think I will definitely be making another one of these dresses since the fit is so great. My only complaint is the skirt ended up being too short so I had to go back and add a band at the bottom which wasn't fun. So if you are 5"9 like me cut your pattern 2.5-3 inches longer.

When we first walked into Hancocks this lime green damask caught my eye. I love damask! However I always thought it was more for pillows and totes, but Matt's mom convinced me to make my dress out of it. I wasn't sure at first, but I really love it now. I'm not sure why my dress is looking more gold than green in every picture I tried to take of it even with our nice canon camera. It's really a vibrant lime green in person. Pictures never seem to do justice to seeing things in person, but it could be because I don't know how to use my nice camera. Add it to my to do list to learn how.

Here is a picture of Matt's moms. Doesn't she look cute?


Monday, July 25, 2011

Junebug Dress Sewalong


I decided to take a break from sewing skirts to join Craftiness is not Optional's Junebug Dress Sew Along. Mostly because everytime I do a sew along with her I learn a ton. Yay for free sewing lessons! She even provides a free pattern for this adorable dress. I was going to give it to one of my nieces, but I love it too much so I think I might just hoard it for when we have a girl. One less dress to make later right? I didn't hem it yet because I'll just wait till I have a model to get the right length.

The dress came together really quickly except when I reached the buttonholes. My Bernina has an automactic button hole foot that memorizes the length of a button holes after sewing one of them so that you get the same size button holes everytime. However it wasn't working consistently no matter what I did. After playing with it for over an hour I looked it up on the internet and realized this just happens if the foot is dusty. So note to self dust off your buttonhole foot before using it. After I dusted it it worked like a charm. I'm just glad there wasn"t something seriously wrong with my machine and it was an easy fix.

I love how the dress turned out especially the daisy buttons. Thanks Jessica for being my sewing teacher for the week.

Sunday, July 17, 2011

Spool 72 Knockoff


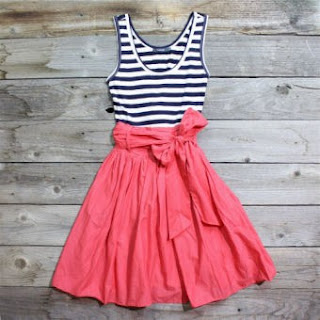
While I was on pinterest I came across this dress from Spool 72 and loved it. I thought the skirt was the cutest part and thought it looked easy enough to knock off. I used New Look pattern 6569 then made a sash that is 2 1/2 inches wide by 96 inches long. I should probably add belt loops, but I'm feeling lazy.


This skirt ended up being a real pain. First it was really hard to find the right color. I eventually found this coral color at Hancocks in the quilting section, but the fabric wasn't very wide so I ended up running out of fabric. Then once the skirt was almost done I realized it was see through and I couldn't get away with just wearing a slip. So I had to go back and add a lining which forced me to go back to the fabric store once again. Then I made the sash too short and then made it too long. I finally got the perfect length for the sash through lots of trial and error. Sewing can get frustrating at times, but the end product is usually worth it in the end. Especially since it saves a lot of money on an outfit that I love. This skirt cost about $15 to make including the lining and the striped tank came from Forever21 for $4.50. The orignial dress cost $57 so I saved myself $37!

Sunday, July 3, 2011

Ruffle Skirt


This skirt is really quick and easy to make. I cut out a piece of pre-ruffled fabric to 44 inches wide by 25.5 inches long. Then I sewed it into a tube, gathered the top, and then sewed the top to a piece of 1.5 inch elastic cut to my waist measurement. Here is a similiar tutorial, but I made it less gathered because I was worried if it was too gathered it would accentuate my thighs which is not my best feature.

I bought the ruffle fabric here. This is the best deal I could find. Most other places I've seen it selling for $17-19 a yard. So go snatch some up because this fabric is great!

I plan on using my scraps to make a pink ruffle tank top for layering. Yay exciting!

Sunday, June 26, 2011

Sew Dang Cute Skirt


I've had this skirt on my to do list for forever and finally got around to it. I used this wonderful tutorial. This is the first time I've drafted my own pattern so it was a little intimidating, but I like how it turned out. In retrospect I wish I made the upper ruffle go up a little higher, but oh well. It was a hit at church. A girl asked me where I bought my skirt because she loved it. I love when people think the clothes I make look like something you can buy in the store because that means my sewing skills are improving. Maybe someday I'll be able to make my own patterns.

Wednesday, June 22, 2011

Dalmation Dresses


While I was in Lake Arrowhead, Matt's mom and I decided to make matching dresses for my nieces SaraJane and Blair. We used this polka dot fabric that Matt's mom had on hand. While we were making it and coming up with the design, we both laughed and thought it looked like a Dalmation. This is where this dress gets it's nickname.

We used this tutorial for the main dress except we only folded it over 2 inches instead of the 3 inches because we wanted a smaller ruffle at the top. Then we made 1.5 inch straps instead of adding sleeves.


We had some extra Ric Rac so we decided to make ric rac flowers for the top. We used this tutorial for the flowers. I love how it turned out looking like a chrysanthemum. I'm not sure what size ric rac we used, but it was a smaller sized ric rac which I think helped it look more like a flower.

The girls loved them. Blair said, "Im going to tell my mom that I want to wear this every Sunday." It's fun having such cute models!

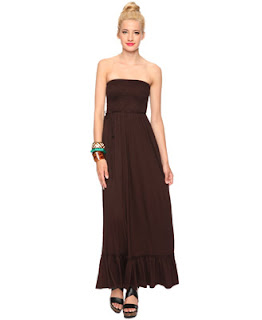
Maxi Dress to Skirt Refashion

Before


After


About a month ago, I saw this maxi dress at Forever 21 on sale for $7.00 and knew it would make a comfortable skirt. Maxi dresses aren't my thing, but I do love how if you can find maxi dresses for cheap they give you a lot of fabric to work with. I wanted to make it into one of those comfy yoga skirts. I used this tutorial from one of my favorite sites. I actually made this when I hosted a sewing night at my house a couple weeks ago since it only took 20 minutes to finish. If you do end up making this make sure to subtract 5-6 inches from your waist measurement so it fits snugly. I LOVE this skirt. It is the most comfortable thing I have ever owned in my entire life. I'm debating if I want to buy another one in pink because it looks like they raised their price to $13.50 for this dress. Hmm it might be worth it. Sorry about the bad picture. I would have modeled it, but its hard to get Matt to take my picture for me. Take my word for it, it looks cute on. Who says you have to give up style for comfort?

Tuesday, June 14, 2011

5 Dollar Skirts


Growing up my mom always sewed with store bought patterns. Somehow she is skilled enough to dicifer the awful directions. I sewed store-bought patterns with her all the time, but she always told me what I was supposed to do to finish it.

When I first got my sewing machine 3 years ago, I bought this fabric on sale from Joanns and New Look pattern 6569 to make myself a skirt. The pattern was labeled easy so I thought I would be able to figure it out myself. Well, I cut it out and got to step 3 then gave up because I had no idea what I was supposed to do to finish the waistband. Who writes these directions anyways? Every year I would try to finish this skirt, would give up, and toss it back in my to finish pile. I meant to have my mom help me with it, but never got around to it.

Well about a week ago, I reread the directions and it finally clicked. Not because the directions made any sense, but because I've learned so much about sewing techniques in this last year that I knew how to finish it! I feel like I finally got to a milestone where I understand clothing construction.

It ended up being such an easy skirt to make that I made two more. I got the other skirt fabric from Hancock Fabric during their Memorial Day sale. These skirts cost me $5 a piece to make. Not bad for some gorgeous skirts eh? The black and white one is my favorite!


Friday, May 27, 2011

Spring Skirt


I've been on a skirt kick lately. Mostly because I'm in desperate need of skirts in my wardrobe. Has anyone else noticed how it's hard to buy modest skirts anymore? Since I'm 5"9 it's even harder for me to find a cute skirt thats long enough. This is where sewing comes in handy.

I found this fabric in the discount bin at Joanns a year ago and fell in love with it. Then I came across this free pattern online and knew it would be perfect. Since my fabric was see through I had to add lining. I decided just to serge the lining and the fabric together then make the skirt. Not sure if that is the correct way of doing it, but meh I follow my own rules. I love the fit of this skirt and it doesn't look homemade when it's finished. I got a ton of compliments at church on Sunday. When I told people that I made it they couldn't believe it. I think I have my new favorite skirt!


Thursday, May 26, 2011

Hawaiian Skirt


Since we had fun sewing the Easter dresses together, Britney and I decided to have another sewing night. We decided to make skirts using this tutorial. We had a little too much fun sewing with everyone because we stayed up till 2 am. We paid for that the next day, but hey we had cute skirts to show for it.

I got the fabric while we were in Hawaii. I think it makes a fun and comfortable summer skirt. Now we just need some good weather so I can wear it!


Easter Dress

Right before we left for Hawaii I made a new friend in our ward. I found out that she loves to sew too. When we were over there, her husband bet her that she wouldn't finish her little girl Easter dresses on time. Well, we couldn't have him win that bet so we got together the next week and finished two of these adorable Easter dresses. I'm happy to report that not only did she win the bet and get a free dinner, but her girls looked adorable on Easter Sunday. We used this free pattern and tutorial.


Sunday, April 3, 2011

Recipe Binder


I've been meaning to organize my recipes for a long time and just got around to it this week. I'm hoping this will make meal- planning way easier and save me some time. For the cover I used this free template and just printed it out on our color printer.

In the front I have a blank calendar where I can write in our menu for the week with a wet erase marker. I included breakfast and lunch because we work from home I have to plan for those meals as well.

On the next page I included a shopping list to go with my menu. I can just grab this binder before we go to the store to make it easy. I might even be able to plan on the way to the store.

On the next page I included a page for recipes to try. Sometimes when I'm blog surfing or searching through my cookbooks I find something I want to try so I can jot down where the source is and have a list available when I'm planning my menus. I'll can also write on this sheet which recipes I've tried, makes the cut, and needs to be typed out to be added to the binder.

Here is a look at the Dividers I designed in PowerPoint. I have it divided into Breakfast, Entrees, Sides, Breads, Dessert, Drinks, and Party Foods.


I dug through all my cookbooks and compiled all the recipes that have ever made it into our rotation. Now I don't have to eat the same old things and have some variety to choose from. I found so many things we love to eat, but forgot about because we were stuck eating the same things because they came to my mind faster. Also all the recipes are tried, tested, and taste good; no gross recipes included. Every recipe I would ever need is in this notebook in one place.

I know it didn't take much crafty ability to make this, but I spent 8 hours on this baby so it deserves an honorable mention on my craft blog. I love it and I feel like it's going to make my life so much easier.

Wednesday, March 23, 2011

Reversible Car seat Canopy


This is car seat canopy I made for my friend this week for her baby shower on Saturday. I used this tutorial and it couldn't be easier. However my friend had a crazy car seat handle so I had a really hard time placing the straps. It doesn't look perfect, but it was the best I could do with the wacky handle. I'll have to keep that in mind when I end up buying a car seat eventually hehe. I still need to add bows onto the straps so maybe it will look better after that. I'm planning on using this bow tutorial. I also made one for my sister in law Kelsey in boy fabrics, but I don't have a car seat to model it anymore. It's really cute though!

Monday, March 14, 2011

Felt Diner Food


Last week I checked my email and Jessi from Sweetie Pie Bakery said she had another pattern for us to test. I was really excited once I saw the adorable pattern. It's called "The Blue Plate Special" and it includes instructions on how to make felt diner food. I tested the spaghetti and meatballs, garlic bread, burger with steak fries, and tomato soup with a grilled cheese sandwich. I only tested half of the pattern, but her pattern also includes how to make meatloaf with mashed potatoes, milk, a strawberry milkshake, a blue plate, a little menu, and an ice cream sundae. Can you say good value for your money? Her patterns are always fun to make and the instructions were very easy to follow even to a pattern challenged person like myself. Her pattern is now for sale and you can buy it here if you're interested. I highly recommend it and I love how most of it was hand sewn so I could make it while I was watching our favorite TV shows. It makes me feel less like a bum. Now I'm off to eat because looking at my fake food made me hungry! Mmmm tomato soup!

Friday, March 11, 2011

Charlotte Dress Sew along


One of my all time favorite craft blogs is Craftiness is not optional. She is amazing and makes the most adorable kids clothes. Once I saw she was throwing a sew-along for a dress she made her adorable 9 month old daughter, I had to join and make one for Jenna's new baby girl on the way. Here is a link to her tutorial and she even emailed me a free pattern for the dress. How cool is she? I was keeping up with the sew-along until day 4. I was serging a seam and my thread snapped. I wanted to cry! It took me 2 hours to figure out how to thread my serger when I first got it and I hadn't touched it since praying that I never had to re-thread the beast again. After another hour looking at the manual and the poorly made video I got the thing working again. So I didn't finish the sew-along on time, but I did finish the dress eventually. It really only takes 30 minutes a day. It was shockingly easy and the final product looks professional. I even installed my first zipper thanks to Jessica's easy directions. I want to make more now!

With the scraps and I mean scraps, I made Sara Jane a matching skirt. I followed the directions for a skirt from this book I bought with an Amazon gift card I got for Christmas from Matt's parents. More baby presents coming soon.

Tuesday, February 8, 2011

Baby dress from an old skirt


The other day I went through my closet and threw out all the old clothes that I didn't wear, were ugly, or didn't fit anymore. It wasn't a pretty sight. I had stuff from 7th grade that was way out of style. Yikes! Did I really wear that? I was about to donate them to DI then I thought to myself that it would be a shame to waste so much fabric that could be used to make something else like doll clothes, baby clothes, purses, baby bibs, etc. However I don't want to have a pile of old clothes laying around so I made a goal to make something weekly from my old clothes. This little baby dress came from an old skirt I had that was too short for me. I used this tutorial and free pattern. It took a little longer to cut out because I had to make all the pattern pieces fit onto the fabric which wasn't easy, but after that it was a breeze to sew together. I'm proud that I recycled and saved money. It will make a cute baby present to give to someone. Plus I'm learning how to construct clothes which isn't my strong point right now. What better way to learn than on fabric you don't care about right?